Using Invoices to Send Smarter Payments
By: Aman Aalam • 5 min read • 1,040 wordsPosted on December 20, 2024
Did you know you can use Trolley’s Invoices feature to group payments into meaningful sets, helping you stay organized and track what each payment is for? In this blog post, we’ll explore how Invoices can simplify your payment process and improve your workflow.

Trolley makes sending payouts to recipients worldwide simple and efficient. But what happens when you need more flexibility—such as grouping payments by tax-reportable activities, combining payouts from different dates, or categorizing payments by campaigns or projects? That’s where Trolley’s Invoices feature comes in.
With Trolley Invoices, you can streamline complex payouts. Let’s say you owe a recipient $500 across four campaigns, including royalties, services, and commissions. Typically, you’d send four separate payments, each tied to a specific activity. While this approach works, you’d incur separate fees for each payment.
Instead, you can use Invoices to group these payments logically. By consolidating them into a single payout with detailed line items for each campaign, you avoid multiple fees, offer a cleaner experience for the recipient, and simplify tax reporting for all parties involved.
With Trolley’s Invoices feature, you gain precision, cost-efficiency, and a better experience for both your team and your recipients.
Invoices and invoice line items
Invoices is a merchant-only feature designed to streamline payouts by logically grouping them into organized sets. Each invoice can include hundreds of line items, enabling you to categorize each payment with precision and clarity.
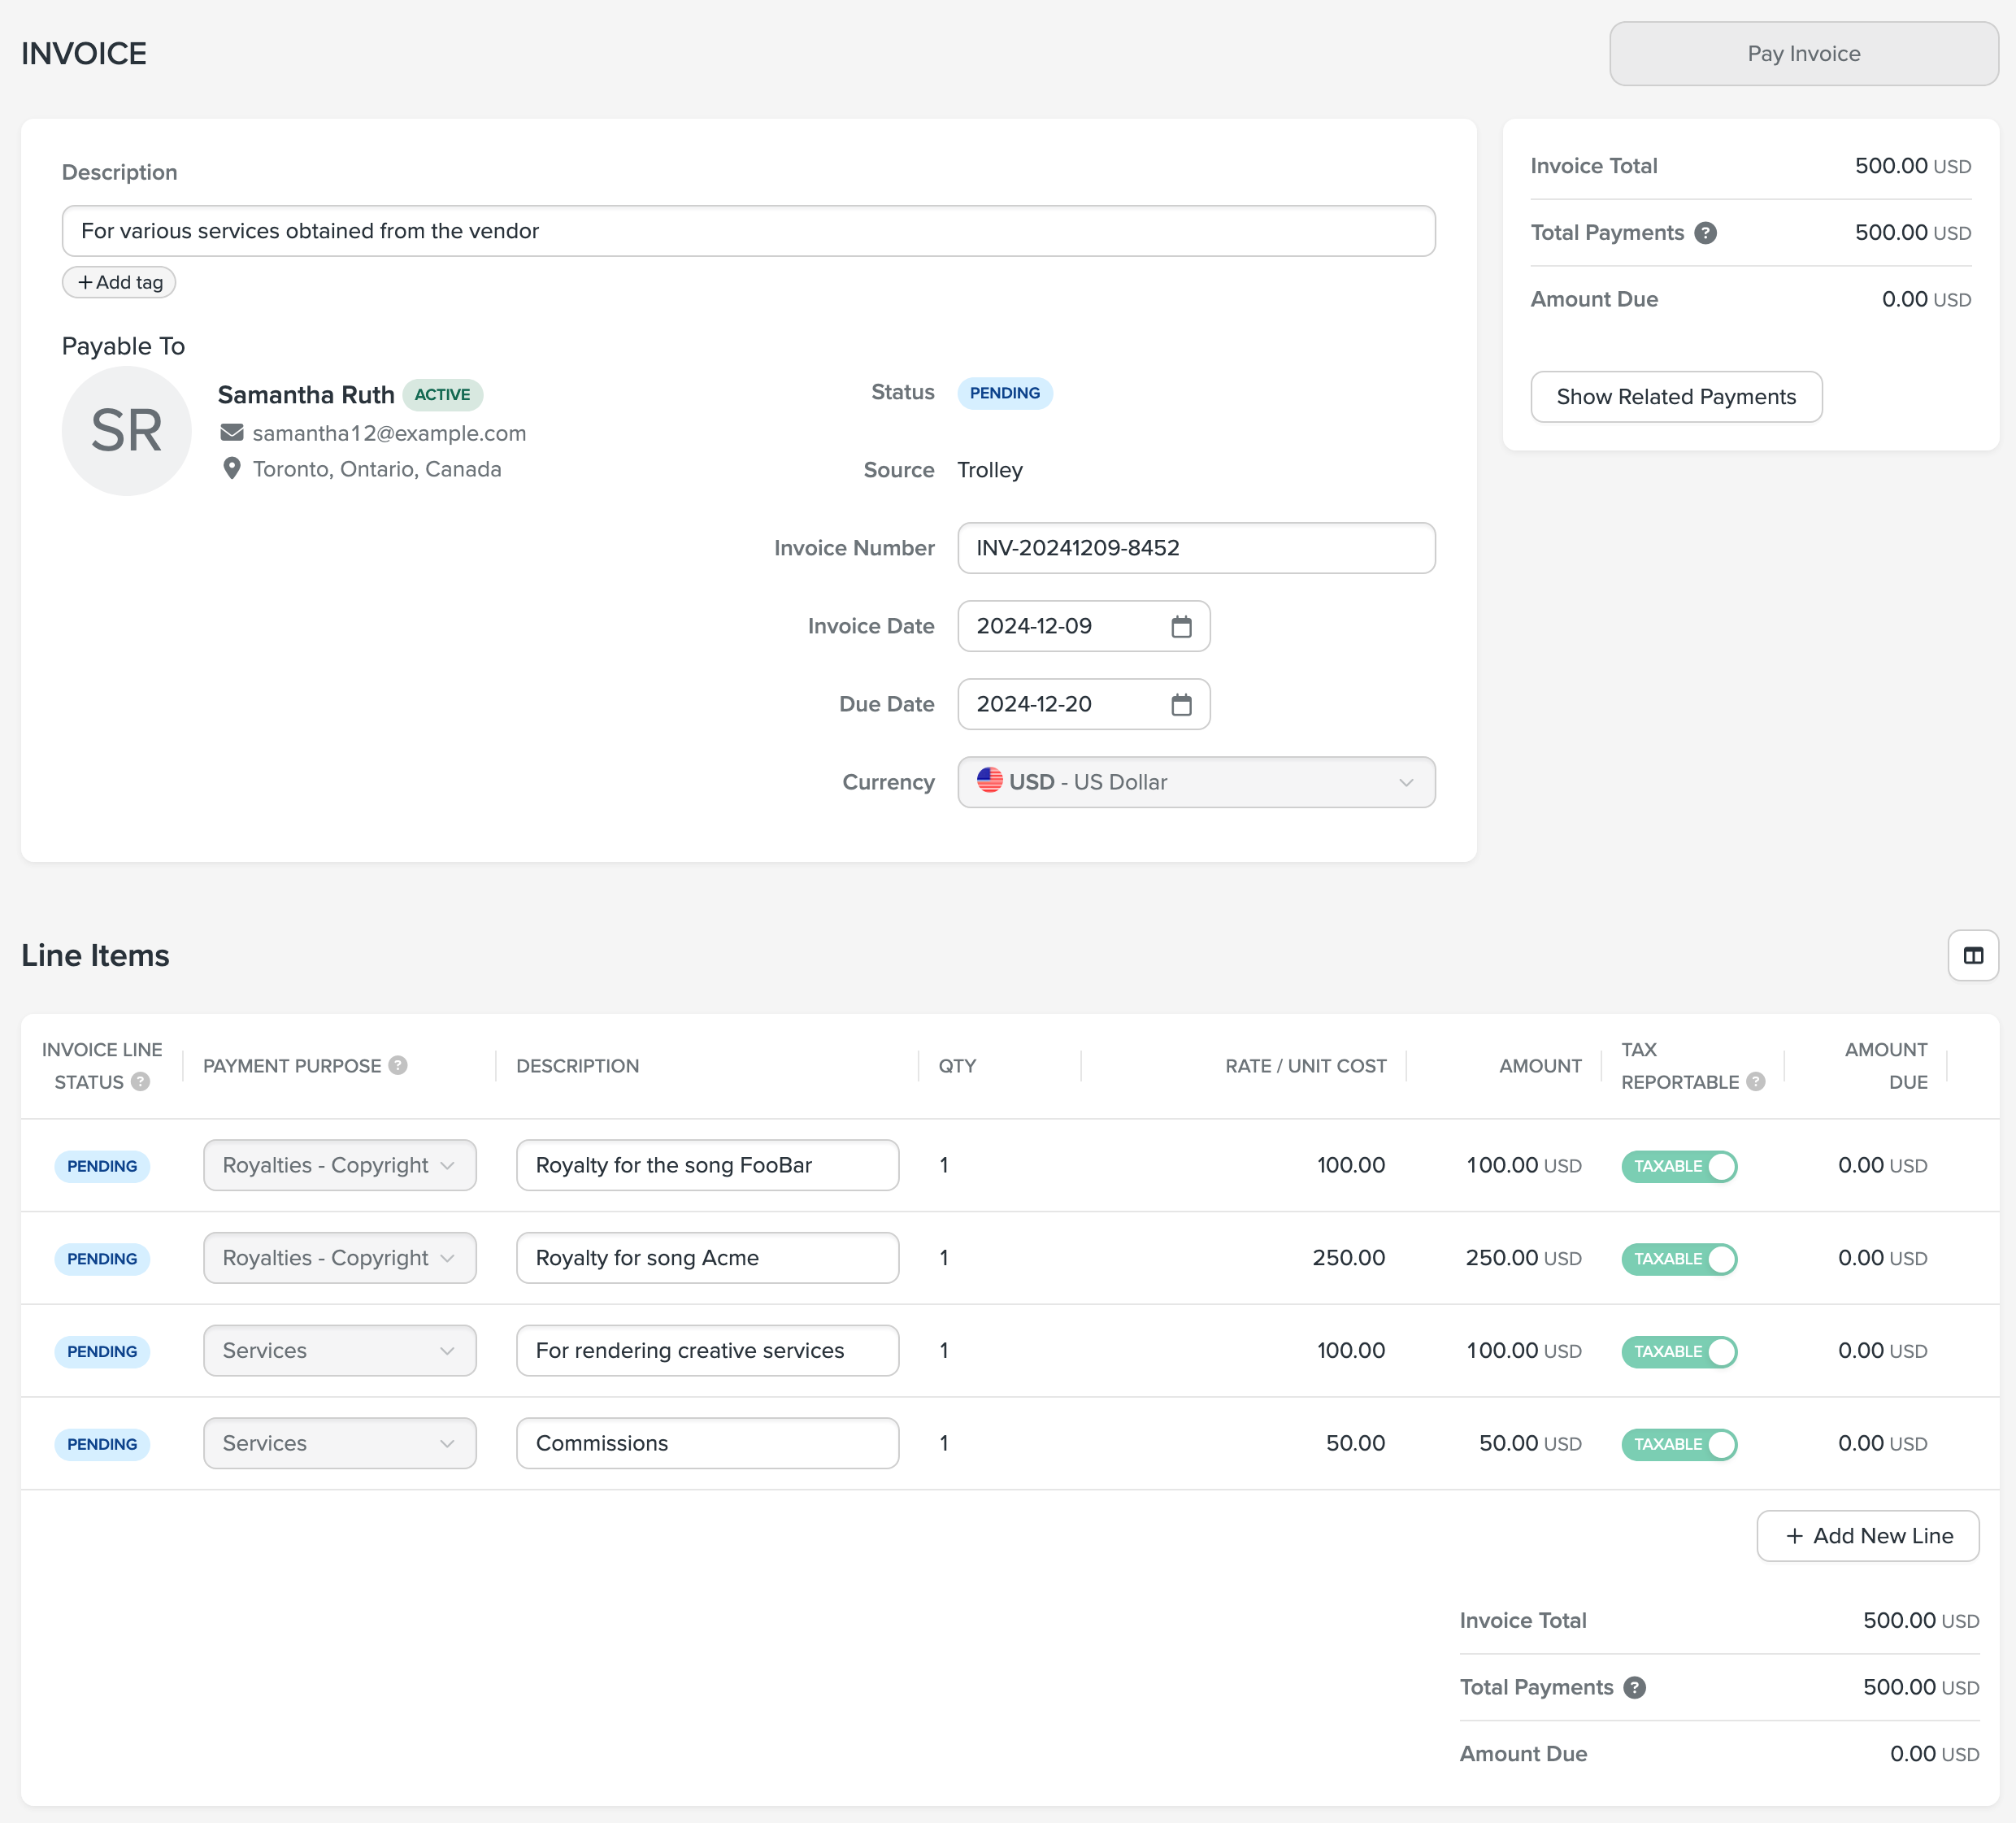
For example, in the scenario mentioned earlier, you can create a single invoice containing four line items, each representing a specific activity or purpose for the payout.
Here’s an example of how this setup might look in an invoice:

(A sample invoice with multiple line items. Click to enlarge)
Each line item in the invoice corresponds to a specific payment you plan to send, providing clear categorization and tracking for every activity.
Alternatively, you could create four separate invoices for the same recipient, each containing a single line item for its respective activity.
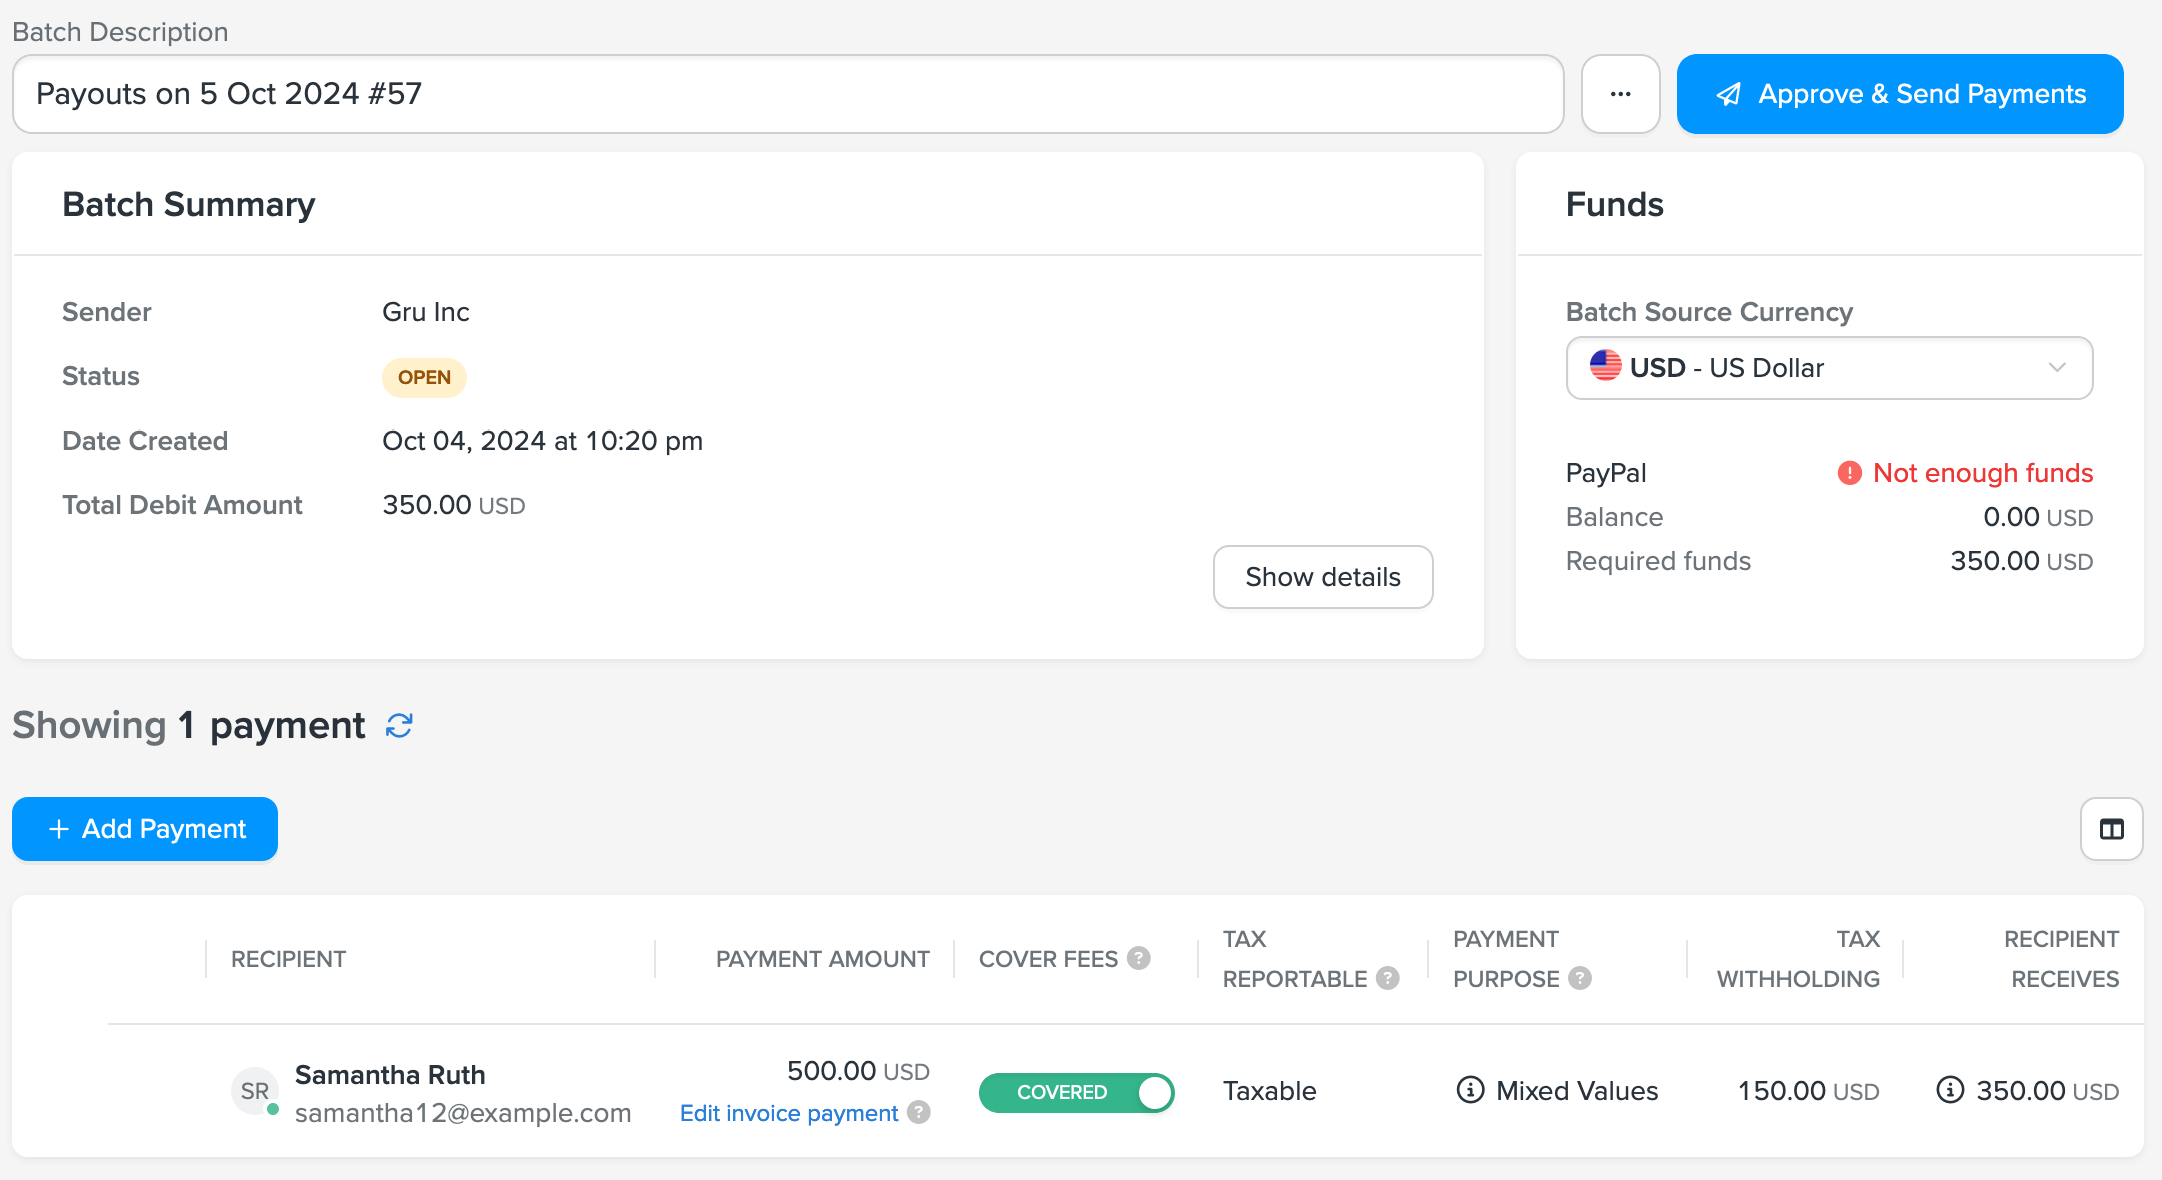
Once your invoice setup is complete, you can generate a payment directly from the invoice and process it within the associated batch.

(A Batch containing the invoice payment. Click to enlarge)
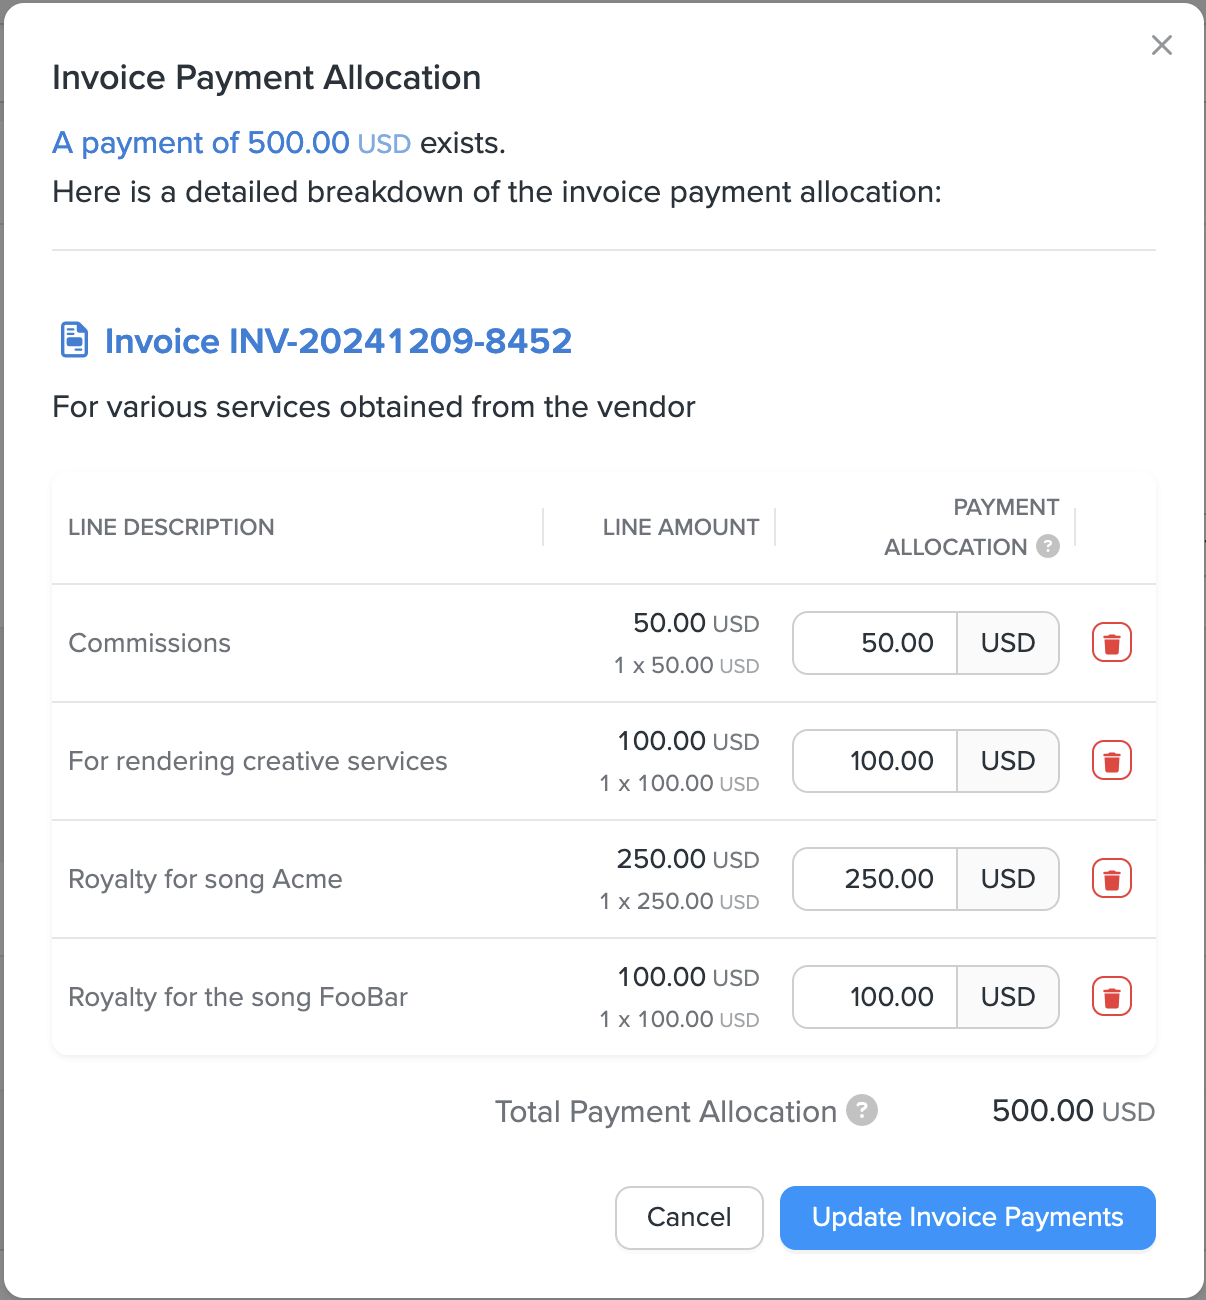
The total payment of US$500 is neatly categorized with an attached invoice. By clicking to view the invoice, you’ll see all the line items that detail the individual components of this payment:

(Invoice line items attached to the payment. Click to enlarge)
This approach allows you to send a single payment while maintaining full visibility into how the payment breaks down across various activities or purposes.
Invoices can be utilized through the Trolley dashboard or via our APIs/SDKs. In the following sections, we’ll demonstrate how to achieve this using our JavaScript SDK for seamless integration.
How to send a payment with Invoices via Trolley API
To create and send payments with Invoices using our APIs or SDKs, follow these steps:
- Create an invoice and associated line items
- Create an invoice payment
- Process the batch containing the invoice payment
We’ll break down each of these steps in more detail.
Step 1: Create invoice and invoice line items
Use the Create an Invoice API to create a new invoice and add line items to it. Here’s an example cURL request to show how it’s done:
// Create a new Invoice with Line Items

curl \
-H 'Authorization: prsign <ACCESS-KEY>:<SIGNATURE>' \
-H 'Content-Type: application/json' \
-H 'X-PR-Timestamp: <timestamp>' \
-L -X POST 'https://api.trolley.com/v1/invoices/create' \
--data-raw '{
    "recipientId": "R-XgtzXghfxx4Z2E4Y3R",
    "description": "Invoice for artwork payment",
    "externalId": "acme-inv-1001",
    "invoiceNumber": "inv-number-1001",
    "dueDate": "2023-02-01"
    "lines": [
        {
            "unitAmount": {
                "value": "100",
                "currency": "EUR"
            }
        }
    ]
}'
You can also add (and edit ) line items of an existing invoice, using the Create an Invoice Line API .
Here’s an example:
// Add two Line Items to an existing Invoice.

curl \
-H 'Authorization: prsign <ACCESS-KEY>:<SIGNATURE>' \
-H 'Content-Type: application/json' \
-H 'X-PR-Timestamp: <timestamp>' \
-X POST 'https://api.trolley.com/v1/invoices/create-lines' \
--data-raw '{
    "invoiceId": "I-HEG4x7Pb8VRkYZnu8Ja",
    "lines": [
        {
            "unitAmount": {
                "value": "200",
                "currency": "EUR"
            },
            "category":"royalties",
            "description":"Royalties for Mona Lisa painting museum viewing",
            "externalId":"acme-inv-royalties-1002",
            "taxReportable": true,
            "forceUsTaxActivity": false,
            "tags":["da vinci", "it"]
        },
        {
            "unitAmount": {
                "value": "100",
                "currency": "EUR"
            },
            "category":"royalties",
            "externalId":"acme-inv-royalties-1003",
            "taxReportable": true
        }
    ]
}'
Step 2: Create an invoice payment
Once you’re ready to make a payment for one or multiple invoices, you can use the Create an Invoice Payment API to create a payment.
Here’s an example cURL request:
// Create an invoice payment with added payment related information

curl \
-H 'Authorization: prsign <ACCESS-KEY>:<SIGNATURE>' \
-H 'Content-Type: application/json' \
-H 'X-PR-Timestamp: <timestamp>' \
-L -X POST 'https://api.trolley.com/v1/invoices/payment/create' \
--data-raw '{
    "batchId": "B-TRk943e5osL1t4ipwsT",
    "memo": "payment memo",
    "externalId": "payment-external-id_123",
    "tags": [
        "invoice_payment",
        "royalty invoice"
    ],
    "coverFees": true,
    "ids":[
        {
            "invoiceId": "I-HEG4x7Pb8VRkYZnu8Ja",
            "invoiceLineId":"IL-EtrPXL9aytREz2vdVgk",
            "amount":{
                "value":"200.00",
                "currency":"EUR"
            }
        },
        {
            "invoiceId": "I-HEG4x7Pb8VRkYZnu8Ja",
            "invoiceLineId":"IL-L9aEtrPXyt2vdVgkREz",
            "amount":{
                "value":"100.00",
                "currency":"EUR"
            }
        }
    ]
}'
You can also add payment-level information directly from the Invoice Payment API.
The response to this API call tells you the batch-id of the batch this payment was added to. You can create this payment in an existing batch or a new one.
Please refer to our API documentation for more details on how to configure this.
You can also read more about how payments and batches work in Trolley .
Step 3: Process the batch containing the invoice payment
Once you’ve created an invoice payment using the Create an Invoice Payment API, the final step is to process the batch containing the payment.
In Trolley, payments are grouped into batches, and you need to process the batch to complete the payment.
Here’s the cURL request showing how to process the batch:
// Process the batch

curl \
-H 'Authorization: prsign <ACCESS-KEY>:<SIGNATURE>' \
-H 'Content-Type: application/json' \
-H 'X-PR-Timestamp: <timestamp>' \
-X POST 'https://api.trolley.com/v1/batches/B-1a2B3c4D5e6F7g8H9i0J1k/start-processing' \
The batch-id used here is obtained after creating an invoice payment. Refer to our documentation for more details on how to process a batch .
Throughout these processes, webhooks related to payments and batches are sent, enabling your systems to stay in sync and monitor progress seamlessly.
What’s next?
The capabilities of the Invoices feature outlined here are just the beginning. By leveraging Invoices and Sync, you can streamline your ERP flows for smoother ingestion and reconciliation.
Check out our developer documentation for a deeper dive into the Invoices APIs , and our product blog for a guide to our ERP sync.
As always, if you have any questions or run into issues, we’re here to help. Feel free to reach out to us at developers@trolley.com anytime!