
Overview
The Trolley Widget is a turn-key solution to onboard your recipients and help them manage their Trolley profile, without needing to write custom code for it.
The Widget is totally white-labeled and you can style it with your branding either from the dashboard or through the code.
Along with helping users onboard, the Widget also helps your users with many other things:
- View payment history
- Add, Remove, or Edit Payout Methods
- View and respond to Support Tickets
- Upload Tax forms
- Perform Individual and Business verifications
In this document we’ll look at how you can integrate the Widget in your system.
Integration Instructions
The Trolley Widget is supposed to be rendered inside of an iframe within your web application’s front-end.
The URL that this iframe loads is computed on your backend server.
We have provided code samples in 6 different programming languages that you can adopt from or can copy and use in your application.
Overall there are following 2 steps to integrate the Widget:
- Initialize the Widget by using the provided sample code.
- Render the Widget on the front end for recipients to use.
Each of these steps is detailed further in this document.
Step 1 - Initialize
// IMPORTANT: Best to use this sample code on server side, not on the front-end, to avoid leaking your API keys

const crypto = require("crypto");
const url = require("url");

const KEY = "<YOUR_ACCESS_KEY>";
const SECRET = "<YOUR_SECRET_KEY>";

const recipientEmail = "sample@recipient.com";
const recipientReferenceId = "bcGEkujzZbB6YG7xsxwKvx";

const widgetBaseUrl = new url.URL("https://widget.trolley.com");
const querystring = new url.URLSearchParams({
  ts: Math.floor(new Date().getTime() / 1000),
  key: KEY,
  email: recipientEmail,
  refid: recipientReferenceId,
  hideEmail: "false", // optional parameter: if 'true', hides the email field
  hideAccountType: "false", // optional parameter: if 'true', hides the account type field
  roEmail: "false", // optional parameter: if 'true', renders the email field as Read Only
  // payoutMethods: "bank-transfer,paypal",   // optional parameter: filters the possible payout methods shown on the Widget
  locale: "en", // optional parameter: ISO 639-1 language code, changes the language of the Widget
  products: "pay,tax", // optional parameter. Specify which modules you want to load
  /*
  ** Adding address fields is optional, Used to easily populate
  ** the Widget with default values.
  **
  'addr.firstName': 'firstName',
  'addr.lastName': 'lastName',
  'addr.governmentId': 'governmentId',
  'addr.street1': 'street1',
  'addr.street2': 'street2',
  'addr.city': 'city',
  'addr.postalCode': 'postalCode',
  'addr.region': 'AL',
  'addr.country': 'US',
  */
  /*
  ** Adding color fields is also optional, used to override the
  ** color settings set in the dashboard. Note that these overrides must
  ** be valid CSS compatible colors.
  **
  'colors.heading': '#111111',
  'colors.inputText': '#222222',
  'colors.inputBorder': '#333333',
  'colors.text': '#555555',
  'colors.subText': '#666666',
  'colors.background': '#777777',
  'colors.primary': 'red',
  'colors.border': 'blue',
  'colors.success': '#AAAAAA',
  'colors.error': '#BBBBBB',
  'colors.warning': '#CCCCCC',
  */
})
  .toString()
  .replace(/\+/g, "%20");

const hmac = crypto.createHmac("sha256", SECRET);
hmac.update(querystring);

// Signature is only valid for 30 seconds
const signature = hmac.digest("hex");
widgetBaseUrl.search = querystring + "&sign=" + signature;

// you can send the link to your view engine
const widgetLink = widgetBaseUrl.toString();
<?php
  $WIDGET_BASE_URL = "https://widget.trolley.com";
  $KEY = "<YOUR_ACCESS_KEY>";
  $SECRET = "<YOUR_SECRET_KEY>";

  $recipientEmail = "sample@recipient.com";
  $recipientReferenceId = "bcGEkujzZbB6YG7xsxwKvx";

  $ts = time();

  $querystring = http_build_query([
    "refid" => $recipientReferenceId,
    "ts" => $ts,
    "key" => $KEY,
    "email" => $recipientEmail,
    "hideEmail" => "false",                       // optional parameter: if "true", hides the email field
    "hideAccountType" => "false",                 // optional parameter: if "true", hides the account type selection
    "roEmail" => "false",                         // optional parameter: if "true", renders the email field as Read Only
    // "payoutMethods" => "bank-transfer,paypal", // optional parameter: filters the possible payout methods shown on the Widget
    "locale" => "en",                             // optional parameter: ISO 639-1 language code, changes the language of the Widget
    "products" => "pay,tax",                      // optional parameter. Specify which modules you want to load
    /*
    ** Adding address fields is optional, Used to easily populate
    ** the Widget with default values.
    **
    "addr.firstName" => "firstName",
    "addr.lastName" => "lastName",
    "addr.governmentId" => "governmentId",
    "addr.street1" => "street1",
    "addr.street2" => "street2",
    "addr.city" => "city",
    "addr.postalCode" => "postalCode",
    "addr.region" => "AL",
    "addr.country" => "US",
    */

    /*
    ** Adding color fields is also optional, used to override the
    ** color settings set in the dashboard. Note that these overrides must
    ** be valid CSS compatible colors.
    **
    "colors.heading" => "#111111",
    "colors.inputText" => "#222222",
    "colors.inputBorder" => "#333333",
    "colors.text" => "#555555",
    "colors.subText" => "#666666",
    "colors.background" => "#777777",
    "colors.primary" => "red",
    "colors.border" => "blue",
    "colors.success" => "#AAAAAA",
    "colors.error" => "#BBBBBB",
    "colors.warning" => "#CCCCCC",
    */
  ], null, "&", PHP_QUERY_RFC3986);

  # Signature is only valid for 30 seconds
  $signature = hash_hmac("sha256", $querystring, $SECRET);

  $widget_link = $WIDGET_BASE_URL."?". $querystring."&sign=".$signature;
?>

<iframe src="<?php echo $widget_link ?>"></iframe>
# -*- coding: iso-8859-15 -*-
import hashlib
import hmac
import time
try:
    import urllib.parse
    urlencode = urllib.parse.urlencode
except:
    import urllib
    urlencode = urllib.urlencode

WIDGET_BASE_URL = 'https://widget.trolley.com'
KEY = b'<YOUR_ACCESS_KEY>'
SECRET = '<YOUR_SECRET_KEY>'
recipient_email = 'sample@recipient.com'
recipient_reference_id = 'bcGEkujzZbB6YG7xsxwKvx'

query = urlencode({
  'ts': int(time.time()),
  'email': recipient_email,
  'refid': recipient_reference_id,
  'hideEmail': 'false',                       # optional parameter: if 'true', hides the email field
  'roEmail': 'false',                         # optional parameter: if 'true', renders the email field as Read Only
  'hideAccountType': 'false',                 # optional parameter: if 'false', hides the account type selection
  # 'payoutMethods': 'bank-transfer,paypal',  # optional parameter: filters the possible payout methods shown on the Widget
  'locale': 'en',                             # optional parameter: ISO 639-1 language code, changes the language of the Widget
  'products': 'pay,tax',                      # optional parameter. Specify which modules you want to load
  # 'addr.firstName' : 'firstName',           # Adding addr. fields is optional. Used to easily populate
  # 'addr.lastName': 'lastName',              # the Widget with default values.
  # 'addr.governmentId': 'governmentId',
  # 'addr.street1': 'street1',
  # 'addr.street2': 'street2',
  # 'addr.city': 'city',
  # 'addr.postalCode': 'postalCode',
  # 'addr.region': 'AL',
  # 'addr.country': 'US',

  # 'colors.heading': '#111111',              # Adding color fields is also optional, used to override the
  # 'colors.inputText': '#222222',            # color settings set in the dashboard. Note that these overrides must
  # 'colors.inputBorder': '#333333',          # be valid CSS compatible colors.
  # 'colors.text': '#555555',
  # 'colors.subText': '#666666',
  # 'colors.background': '#777777',
  # 'colors.primary': 'red',
  # 'colors.border': 'blue',
  # 'colors.success': '#AAAAAA',
  # 'colors.error': '#BBBBBB',
  # 'colors.warning': '#CCCCCC',

  'key': KEY,
}).replace("+", "%20").encode('utf8')

query = '%s&sign=%s' % (
  query,
  hmac.new(SECRET, query, digestmod=hashlib.sha256).hexdigest()
)
require "openssl"
require "ostruct"
require "uri"

WIDGET_BASE_URL = "https://widget.trolley.com"
API = "<YOUR_ACCESS_KEY>"
SECRET = "<YOUR_SECRET_KEY>"
recipient_email = "sample@recipient.com"
recipient_reference_id = "bcGEkujzZbB6YG7xsxwKvx"

ts = Time.now.to_i

query = {
  'email' => recipient_email,
  'refid' => recipient_reference_id,
  'ts' => ts,
  'key' => API,
  'hideEmail' => false,                         # optional parameter: if 'true', hides the email field
  'roEmail' => false,                           # optional parameter: if 'true', renders the email field as Read Only
  'hideAccountType' => false,                   # optional parameter: if 'true', hides the account type selection
  # 'payoutMethods' => 'paypal',                # optional parameter: filters the possible payout methods shown on the Widget
  'locale' => 'en',                             # optional parameter: ISO 639-1 language code, changes the language of the Widget
  'products': 'pay,tax',                        # optional parameter. Specify which modules you want to load
  # 'addr.firstName' => 'firstName',            # Adding addr. fields is optional. Used to easily populate
  # 'addr.lastName' => 'lastName',              # the Widget with default values.
  # 'addr.governmentId' => 'governmentId',
  # 'addr.street1' => 'street1',
  # 'addr.street2' => 'street2',
  # 'addr.city' => 'city',
  # 'addr.postalCode' => 'postalCode',
  # 'addr.region' => 'AL',
  # 'addr.country' => 'US',

  # 'colors.heading' => '#111111',               # Adding color fields is also optional, used to override the
  # 'colors.inputText' => '#222222',             # color settings set in the dashboard. Note that these overrides must
  # 'colors.inputBorder' => '#333333',           # be valid CSS compatible colors.
  # 'colors.text' => '#555555',
  # 'colors.subText' => '#666666',
  # 'colors.background' => '#777777',
  # 'colors.primary' => 'red',
  # 'colors.border' => 'blue',
  # 'colors.success' => '#AAAAAA',
  # 'colors.error' => '#BBBBBB',
  # 'colors.warning' => '#CCCCCC'
}

digest = OpenSSL::Digest.new("sha256")

query_string = URI.encode_www_form(query).gsub("+", "%20")

# Signature is only valid for 30 seconds
signature = OpenSSL::HMAC.hexdigest(digest, SECRET, query_string)

# you can use the link in your templating engine
widget_link = "#{WIDGET_BASE_URL}?#{query_string}&sign=#{signature}"
using System;
using System.Text;
using System.Collections.Generic;
using System.Security.Cryptography;

class Program
{
  static void Main(string[] args)
  {
    var API = "<YOUR_ACCESS_KEY>";
    var SECRET = "<YOUR_SECRET_KEY>";
    var widgetBaseUrl = "https://widget.trolley.com";
    var recipientEmail = "sample@recipient.com";
    var recipientReferenceId = "sbcGEkujzZbB6YG7xsxwKvx";

    Dictionary<string, string> queryParams = new Dictionary<string, string>{
              { "ts", $"{(int)(DateTime.UtcNow - new DateTime(1970, 1, 1)).TotalSeconds}" },
              { "key", $"{API}" },
              { "email", $"{recipientEmail}" },
              { "refid", $"{recipientReferenceId}" },
              { "hideEmail", "false" },                 // optional parameter: if true, hides the email field
              { "roEmail", "false" },                   // optional parameter: if true, renders the email field as Read Only
              { "hideAccountType", "false" },           // optional parameter: if true, hides the account type selection
              // { "payoutMethods", "bank-transfer" },  // optional parameter: filters the possible payout methods shown on the Widget
              { "locale", "en" },                        // optional parameter: ISO 639-1 language code, changes the language of the Widget
              { "products", "pay,tax"},                  // optional parameter. Specify which modules you want to load
              /*
              ** Adding address fields is optional, Used to easily populate
              ** the Widget with default values.
              **
              { "addr.firstName", "firstName" },
              { "addr.lastName", "lastName" },
              { "addr.governmentId", "governmentId" },
              { "addr.street1", "street1" },
              { "addr.street2", "street2" },
              { "addr.city", "city" },
              { "addr.postalCode", "postalCode" },
              { "addr.region", "AL" },
              { "addr.country", "US" },
              */

              /*
              ** Adding color fields is also optional, used to override the
              ** color settings set in the dashboard. Note that these overrides must
              ** be valid CSS compatible colors.
              **
              { "colors.heading", "#111111" }
              { "colors.inputText", "#222222" }
              { "colors.inputBorder", "#333333" }
              { "colors.text", "#555555" }
              { "colors.subText", "#666666" }
              { "colors.background", "#777777" }
              { "colors.primary", "red" }
              { "colors.border", "blue" }
              { "colors.success", "#AAAAAA" }
              { "colors.error", "#BBBBBB" }
              { "colors.warning", "#CCCCCC" }
              */
            };

    string query = "";

    foreach (var kvp in queryParams)
    {
      query += $"{kvp.Key}={Uri.EscapeDataString(kvp.Value)}&";
    }

    HMACSHA256 hmac = new HMACSHA256(Encoding.UTF8.GetBytes(SECRET));
    // Signature is only valid for 30 seconds
    var signature = (BitConverter.ToString(hmac.ComputeHash(Encoding.UTF8.GetBytes(query)))).Replace("-", "").ToLower();

    string returnUrl = ($"{widgetBaseUrl}?{query}&sign={signature}");
  }
}
// Created using Java 19
// Using org.apache.http.client.utils.URIBuilder;

import java.net.URISyntaxException;
import java.nio.charset.StandardCharsets;
import java.security.InvalidKeyException;
import java.security.NoSuchAlgorithmException;

import javax.crypto.Mac;
import javax.crypto.spec.SecretKeySpec;

import org.apache.http.client.utils.URIBuilder;

public class Widget
{
    public String getTrolleyWidgetUrl() throws URISyntaxException, NoSuchAlgorithmException, InvalidKeyException
    {

        // Setup values
        String SCHEME = "https";
        String WIDGET_HOST = "widget.trolley.com";

        String ACCESS_KEY = "<YOUR_ACCESS_KEY>";
        String ACCESS_SECRET = "<YOUR_SECRET_KEY>";

        int timestamp = (int)(System.currentTimeMillis() / 1000L);

        String recipientEmail = "sample@recipient.com";
        String recipientReferenceId = "bcGEkujzZbB6YG7xsxwKvx";

        // Adding query parameters
        URIBuilder uriBuilder = new URIBuilder();

        uriBuilder.addParameter("ts", String.format("%d",timestamp));
        uriBuilder.addParameter("key", ACCESS_KEY);
        uriBuilder.addParameter("refid", recipientReferenceId);
        uriBuilder.addParameter("email", recipientEmail);
        uriBuilder.addParameter("products", "pay,tax");   // optional parameter. Specify which modules you want to load

        /*
         * Adding the following fields is optional, Used to easily populate
         * the Widget with default values.
         */

        // uriBuilder.addParameter("hideEmail", "true");
        // uriBuilder.addParameter("roEmail", "false");
        // uriBuilder.addParameter("locale", "en");
        // uriBuilder.addParameter("hideAccountType", "true");

        // uriBuilder.addParameter("payoutMethods", "bank-transfer,paypal");
        // uriBuilder.addParameter("addr.firstName", "John");
        // uriBuilder.addParameter("addr.lastName", "Smith");
        // uriBuilder.addParameter("addr.governmentId", "ABCD123");
        // uriBuilder.addParameter("addr.street1", "120 Some Street");
        // uriBuilder.addParameter("addr.street2", "Block 123");
        // uriBuilder.addParameter("addr.city", "Montreal");
        // uriBuilder.addParameter("addr.postalCode", "A0A B0B");
        // uriBuilder.addParameter("addr.region", "QC");
        // uriBuilder.addParameter("addr.country", "CA");

        /*
         * Adding color fields is also optional, used to override the
         * color settings set in the dashboard. Note that these overrides must
         * be valid CSS compatible colors.
         */

        // uriBuilder.addParameter("addr.country", "CA");
        // uriBuilder.addParameter("colors.heading", "#111111");
        // uriBuilder.addParameter("colors.inputText", "#222222");
        // uriBuilder.addParameter("colors.inputBorder", "#333333");
        // uriBuilder.addParameter("colors.text", "#555555");
        // uriBuilder.addParameter("colors.subText", "#666666");
        // uriBuilder.addParameter("colors.background", "#FFFFFF");
        // uriBuilder.addParameter("colors.primary", "red");
        // uriBuilder.addParameter("colors.border", "blue");
        // uriBuilder.addParameter("colors.success", "#AAAAAA");
        // uriBuilder.addParameter("colors.error", "#BBBBBB");
        // uriBuilder.addParameter("colors.warning", "#CCCCCC");

        // Preparing to create hash
        String encodedParams = uriBuilder.build().toString().substring(1);

        final SecretKeySpec encodedSecretKey = new SecretKeySpec(ACCESS_SECRET.getBytes(StandardCharsets.UTF_8), "HmacSHA256");

        final Mac mac = Mac.getInstance("HmacSHA256");
        mac.init(encodedSecretKey);

        final byte[] paramBytes = mac.doFinal(encodedParams.getBytes(StandardCharsets.UTF_8));

        final StringBuffer hash = new StringBuffer();
        for (int i = 0; i < paramBytes.length; ++i) {
            final String hex = Integer.toHexString(0xFF & paramBytes[i]);
            if (hex.length() == 1) {
                hash.append('0');
            }
            hash.append(hex);
        }

        // Create signed hash
        String digest = hash.toString();

        // Add hashed value to query parameter
        uriBuilder.addParameter("sign", digest);

        // Set scheme and host
        uriBuilder.setScheme(SCHEME);
        uriBuilder.setHost(WIDGET_HOST);

        // Create Widget URI String to load into an iframe
        return uriBuilder.build().toString();
    }
}
In order to render the Widget in an iframe you need to provide some required information.
To do that, you have to perform the following steps:
-
Prepare a query string with the following information:
a. API Keys: You need the
ACCESS_KEYin the query string that you get from the dashboard.
b. Recipient Information: Information of the Recipient the Widget should be loaded for (detailed below).
c. The current timestamp.
d. Any other optional configuration options (detailed in Reference below). -
Sign the final query string using the
ACCESS_SECRET. -
Append the raw query string and the signed digest to the base URL for the Widget.
We have provided sample code in 6 different programming languages to show you how to do this.
This code is ready to deploy, feel free to review it, copy it, and use it in your code.
Note: The hmac signature is only valid for 30 seconds.
Usually, you would want to display the Widget under the User Profile or Settings sections where the recipients can manage their profile and payout settings.
Please refer to the Reference section for more information on API Keys and Recipient Information.
Step 2 - Render
widgetLink is the URL that needs to be returned by your application, to be either used in an iFrame or in a browser address bar. Typically, the URL would be used in a page related to a recipients account profile or their payout preferences.
Widget Modules
The Widget can load different modules as per the products you have enabled, and based on what modules you want to show the recipients on a certain page in your flow.
NOTE: for all widget embeds, the recipient profile will be presented first followed by the chosen modules.
The modules that you can load, are:
- Pay
- Tax
- Trust
To specify which module you want to load, supply a products parameter and use a mix of pay, tax, or trust values separated by commas.
Make sure you’re using Percent Encoding to URL encode the query parameters.
Here’s an example of how the URL Encoded query example might look like using Percent Encoding:
| Query Params | URL Encoded Query Params |
|---|---|
| products : pay,tax | products=pay%2Ctax |
Refer to our code samples for an example, and to the reference section on Modules for more details.
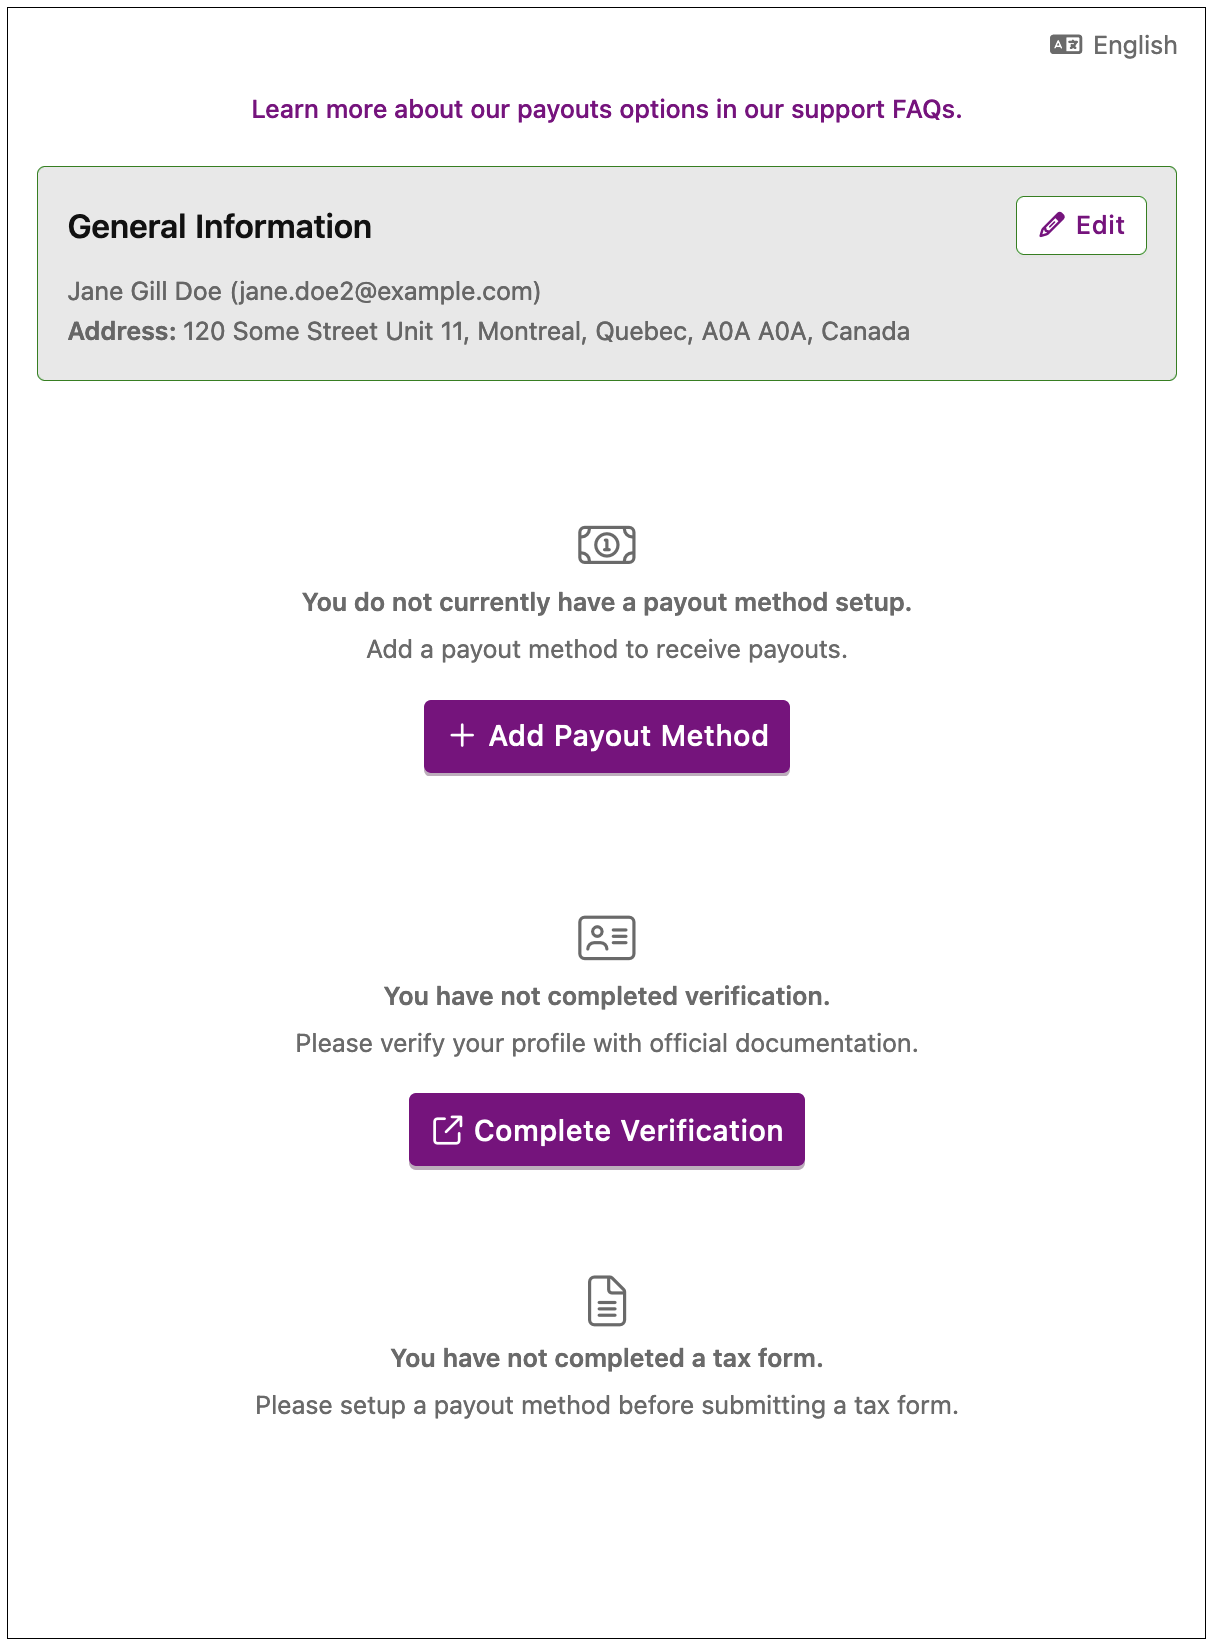
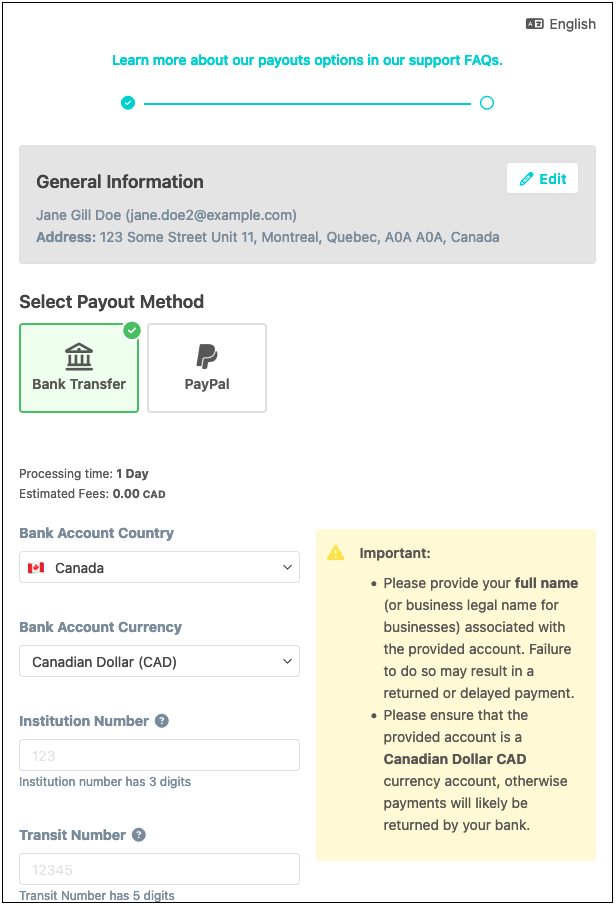
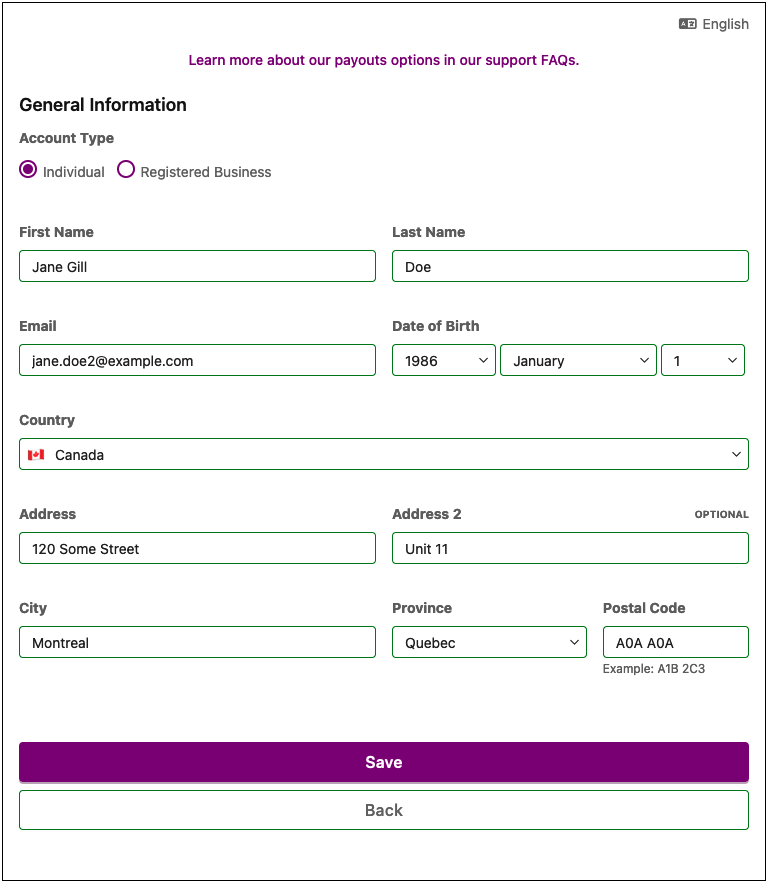
Pay Module
The Pay module enables you to onboard your recipients and let them add their banking information.
Here’s a quick preview of the flow of the Pay module.
Pay module is enabled by default once a Pay subscription is associated with the account.
If you don’t want to render the Pay module in the Widget while loading other modules, you can exclude it from the list of modules you supply in the products parameter.
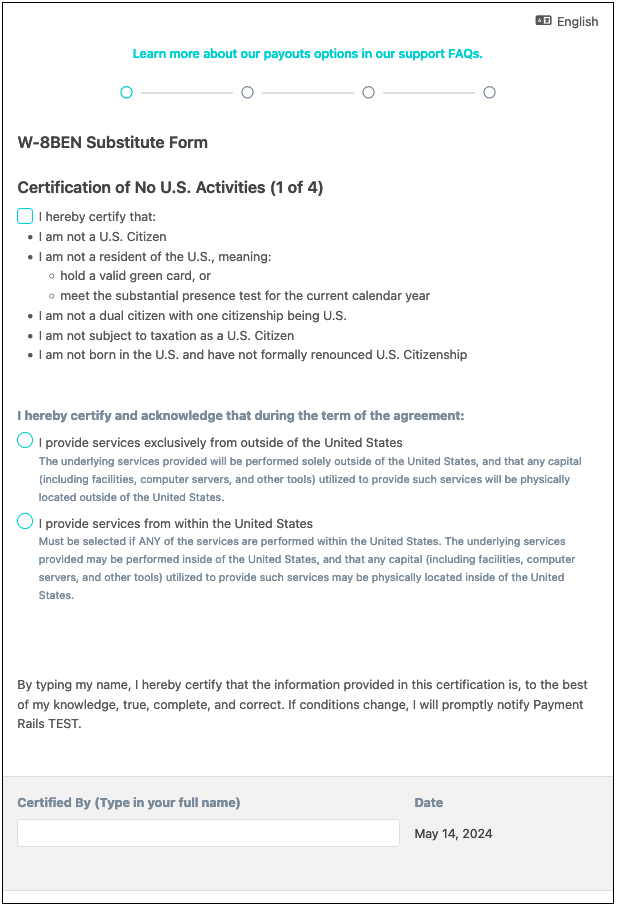
Tax Module
The Tax module helps the recipients submit their Tax related information. Based on your settings, it could either be US Tax, or DAC7 Tax forms that the recipients will be filling in.
To use the Tax module in production, your subscription plan should include it. However, it is available for all to use in the sandbox mode.
To render the Tax module, first enable it in your account’s settings, and pass products=tax as the query parameter.
If you’re loading other modules too, have tax included as one of the products.
Here’s a quick preview of the flow of the Tax module.
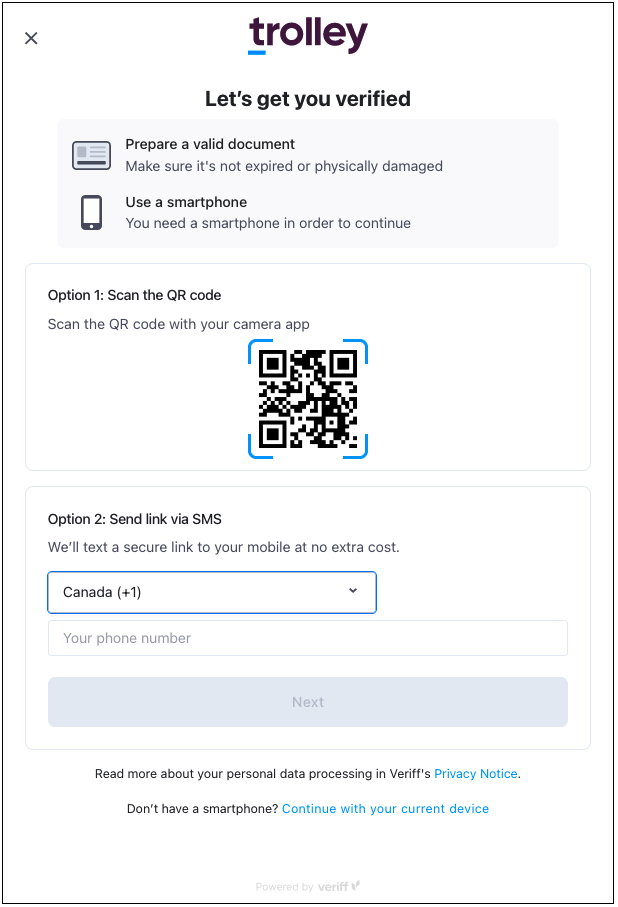
Trust Module
To use the Pay module, enable it by passing products=trust as the query parameter, or have trust included as one of the products.
Just like the Tax module, to use the Trust module in production, your subscription plan should include it. However, it is available for all to use in the sandbox mode.
To render the Trust module, first enable it in your account’s settings, and pass products=trust as the query parameter.
If you’re loading other modules too, have trust included as one of the products.
Here’s a quick preview of the flow of the Trust module.
Note: A part of this flow requires the recipients to use their mobile device and follow the on-screen instructions. A preview of those steps is not shown here.
If no module is provided or if the products parameter is empty, all the modules enabled within your merchant settings, will appear in the Widget.
Recipient Profile
The Recipient Profile is a default module which allows the recipient to enter general information such as their name and address. Because this information is essential for all other modules, the user profile precedes all other modules.
Events Emitter
The Widget emits events upon successful completion of some selected activities so that your web page can take any actions when these activities happen.
This is how the event emitter also enables cross-origin communication between the page and the embedded iframe.
To listen to these Widget events, you need to implement an event listener using window.addEventListener("message", function(e) {...}) in your webpage that hosts the Widget iframe. The events object contains some additional data which you can make use of.
Switch to the JavaScript view in the code viewer to see an example.
The following events will be available:
List of Events
//To be run on the front end

(function() {
  window.addEventListener("message", function(e) {
    var widgetEvent = e.data;

    if (widgetEvent.event === "document.height") {
      //Document's height changed
      console.log('Changed Height', widgetEvent.document.height);

      //Example Action: setting iframe height as per data received
      var iframeElement = document.getElementById("trolley-widget");

      if (iframeElement) {
        iframeElement.style.height = widgetEvent.document.height;
      }

    }else if (widgetEvent.event === "document.loaded") {
      // The document has been loaded
      console.log(`Document Loaded. Name of the event - ${widgetEvent.event}`);

    }else if (widgetEvent.event === "document.failed") {
      // The document failed to load
      console.log(`Document failed to load. Name of the event - ${widgetEvent.event}.`);
      console.log(`Error Message: "${widgetEvent.document.message}".`);
      console.log(`Error Code: "${widgetEvent.document.code}"`);

    }else if(widgetEvent.event === 'module.loaded'){
      // A module has been loaded
      console.log(`${widgetEvent.module[0]} module loaded.`);

    }else if(widgetEvent.event === 'module.successful'){
      // A module has submitted its data successfully
      console.log(`${widgetEvent.module[0]} module submitted successfully.`);

    }else if(widgetEvent.event === 'module.failed'){
      // A module failed to submitted it's data
      console.log(`${widgetEvent.module[0]} module failed.`);

    }
  });
})();
We have two types of events, Developer Experience and Module related, all set as the e.data.event value, as shown in the Javascript code sample.
Developer Experience Events
These events tied to generalized event workflows to improve the overall widget integration experience.
| Event Name | Event Object | Description |
|---|---|---|
| document.loaded | e.data.document | When the Widget is initially loaded on the page. |
| document.failed | e.data.document | When the Widget fails to authenticate and/or load. The document object will further contain message and code fields explaining the error. Look at Debugging Errors for more. |
| document.height | e.data.document | When the height of the Widget changes, often due to different pages or screen size adjustments. |
Module Events
These events are available for each module you have enabled pay, tax, trust, and profile. The specific module is identified within e.data.module.
| Event Name | Event Object | Description |
|---|---|---|
| module.loaded | e.data.module | When the UI for that module is available to the recipient. Only triggered on the first page of multi-page modules. |
| module.successful | e.data.module | When the module was submitted successfully by the recipient. |
| module.failed | e.data.module | When the submission of the module by the recipient hits an error. |
Events on Mobile Devices
If you’re loading the Widget inside a webview on your Android/iOS apps, you can use the native bindings that Android and iOS provide, to listen to these events.
Follow these simple steps for this:
- Prepare a webpage which contains the Widget iframe, along with your JavaScript code. This code will listen to the Widget events.
- Load this webpage in the webview, and setup your native code binding (see blow for Android/iOS platform documentation).
- Setup your JavaScript code to call the native callback methods, whenever it receives any widget event.
For Android, here’s the official Android documentation detailing how to Bind JavaScript to Android code.
For iOS, here’s the official iOS documentation that details how to use WKUserContentController to bind with JavaScript.
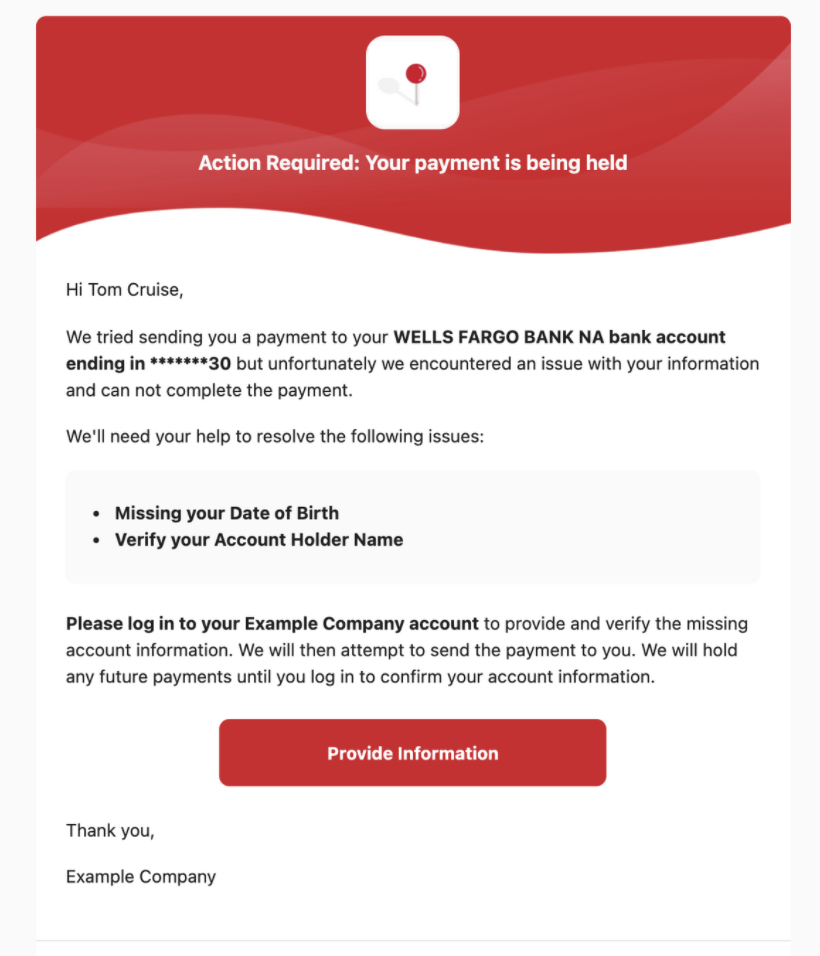
Tickets in Widget
Tickets are created by the Trolley team when we need additional information from a recipient regarding a payment. They can be automatically sent directly to your recipients for prompt response to facilitate their payment without you having to individually contact them
When a Ticket is created to request for information from a recipient, the Widget automatically shows a notice and requests the recipients for the information.
No Dev Setup Required
The tickets flow doesn’t require any coding to setup. However, you may need to do configuration in the Trolley Dashboard.
To find out how to do that, please refer to our product documentation: Getting Started with Tickets
Debugging Integration Errors
Not every integration goes right the first time. To assist you in debugging these issues, we return error messages in the HTML and emit respective events to tell you the Widget ran into errors.
When the Widget encounters errors, following things happen:
- The error is displayed on screen for recipients/users to see.
- The returned HTML body contains an ERROR HTML comment that should help you debug the issue visually.
- A
document.failedevent is emitted.
Each of the above is explained in the sections below.
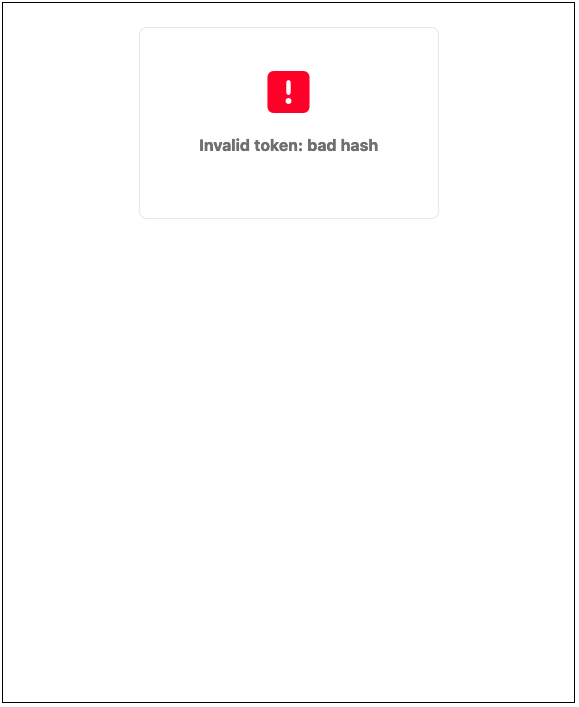
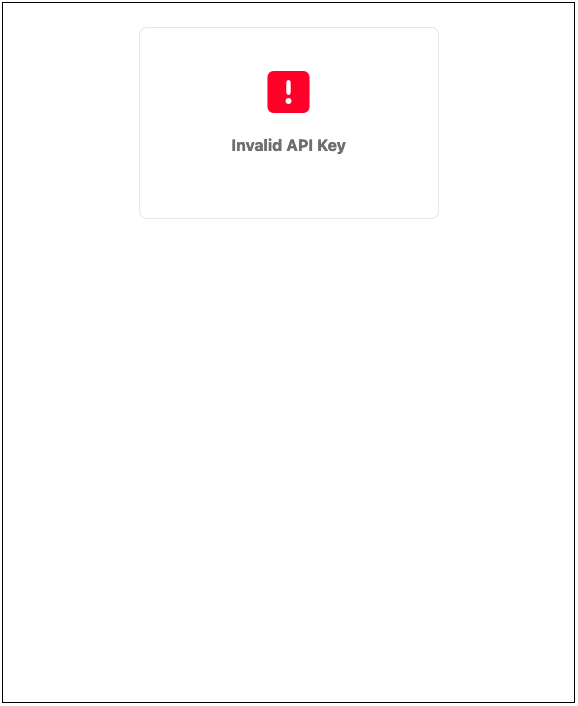
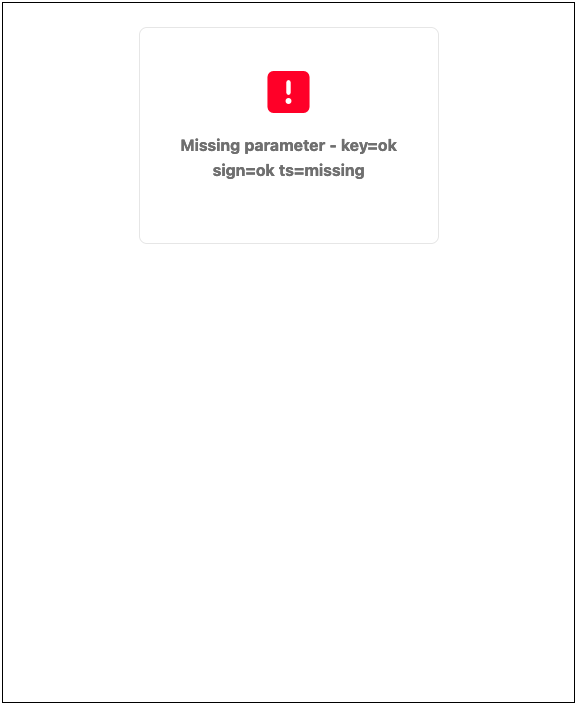
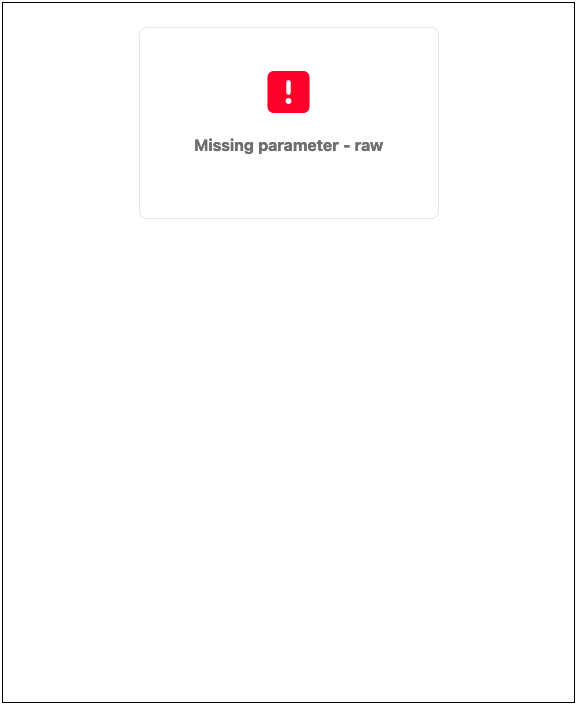
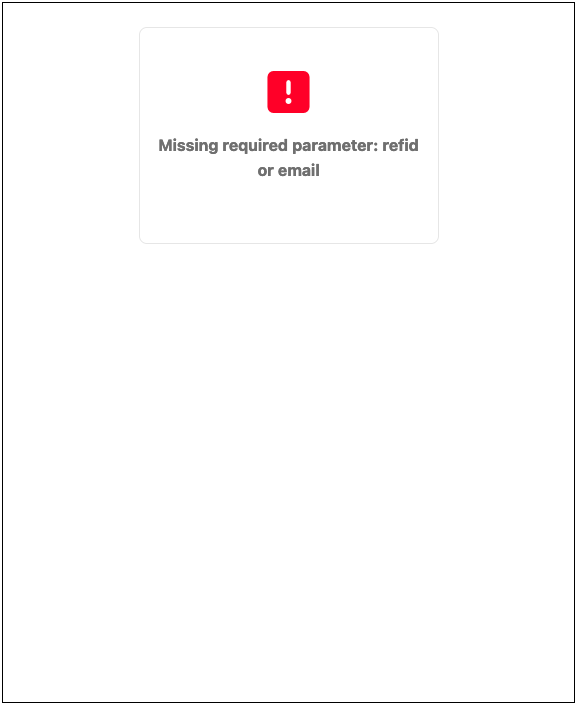
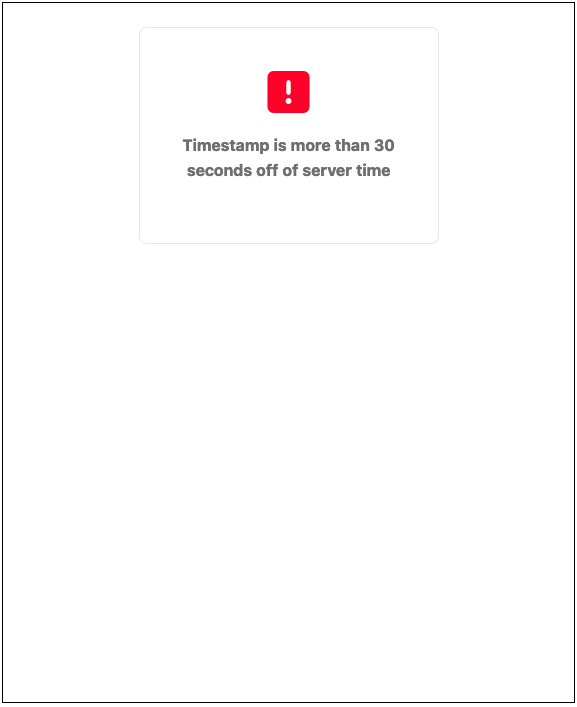
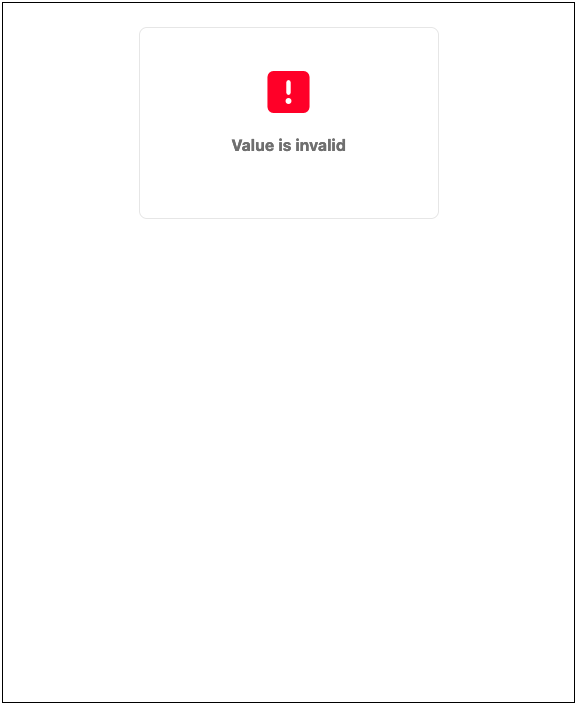
Error Screenshots
Here are the screenshots of some common errors showing how these errors look visually to the recipients:
Errors in HTML Body
If you Inspect the page, you will see the errors as a block of code similar to the following:
    <body>


        ...


          <!--ERRORS: invalid_api_key Timestamp is more than 30 seconds off of server time -->


        ...


    </body>
Error Events
When the Widget encounters errors, it emits a document.failed event that contains a document object with document.message and document.code fields containing more information.
Here’s how that document object looks for the same error when document.failed event is fired:
    document: {

     message: "Timestamp is more than 30 seconds off of server time",

     code: "invalid_api_key"

   }
Look at Events Emitter to learn how to subscribe to Widget events.
List of Common Errors
Here’s a list of common errors that you’ll see, their explanation, and values for document.code and document.message objects:
| Error Name | code |
message |
Explanation |
|---|---|---|---|
| Invalid token: bad hash | bad_hash | Invalid token: bad hash | Your computation of the signed value is incorrect. This could happen because the URL being loaded in the iFrame is stale. Make sure your web app is computing this URL for every request and is not cached. |
| Invalid API Key | invalid_api_key | Invalid API Key | The Public key used by is not found in your merchant account. Ensure that your API key and secret aren’t disabled, and that they point to the appropriate environment for you integration (live or sandbox). |
| Missing Parameter - key=ok sign=ok ts=missing | invalid_param_ts | Missing parameter - key=ok sign=ok ts=missing | Some parameters are missing. For example, the timestamp is missing in this example. |
| Missing Parameter - raw | invalid_param | Missing Parameter - raw | No parameters were supplied. |
| Missing required parameter: refid or email | invalid_refid_email | Missing required parameter: refid or email | Required information of recipient is missing. You must provide either referenceId or email to highlight which recipient you want to load. |
| Value is invalid | invalid_value | Value is invalid | The recipient email is incorrectly formatted. |
| Timestamp is more than 30 seconds off of server time | timestamp_expired | Timestamp is more than 30 seconds off of server time | The timestamp is more than 30 seconds off. You need to synchronize your clock’s UTC time. |
| Email already exists | duplicate_email | Email already exists | The email supplied to create a new recipient already exists. |
The above explanations should help you understand these errors, and take action by responding to document.failed event when they occur on the frontend.
Resolving Errors
If you hit these errors, please look at the above explanation to understand what the codes mean to fix them accordingly.
Since these errors occur on your frontend, we suggest you subscribe to the document.failed event and send back useful actionable information to your backend.
Check out the sample code for listening to events for an example on how to respond document.failed events.
Here are some extra tips:
- Make sure to generate a new URL every time the Widget is loaded.
- Ensure that your API key and secret aren’t disabled, and that they point to the appropriate environment for you integration (live or sandbox)
If you continue to face issues, please reach out to us at developers@trolley.com.
Reference
API Keys
ACCESS_KEY
API Access Key is provided to authenticate with Trolley API, which the Widget uses to function, and to indicate which environment you want to use - sandbox or production.
SECRET_KEY:
The secret key is used to sign the query parameters and generate a hash that you’re required to send with the Widget URL.
These keys can be created on the dashboard in the Settings > API Keys section.
Recipient Information
The Widget loads up for an individual recipient, so you have to supply it with information pertaining to an individual recipient you want to load.
This information can either be the email id or the reference id of the recipient.
Recipient Email ID
Email address of the recipient you will create or edit. Using an email address that is not yet linked to a recipient in your Trolley account will create a new recipient with that email address in your Trolley account. All email addresses are unique.
Recipient Reference ID
Your internal recipient Reference ID for the recipient you will create or edit. If no Reference ID is provided Trolley will look for an email in the query parameters, and will raise an error if that’s not found.
Using Reference ID and Email together
When you provide only one of either refid or email for the recipient, the Widget looks up the Recipient only with the parameter that’s provided.
But when you provide refid and email both, then the lookup logic prefers refid over the email.
To further detail:
-
When a Recipient is found with the
refid, we load widget for them as long as theemailprovided is assigned to them. -
When a Recipient is found with
refidbut theiremaildoesn’t match with the one provided in the parameter, we try to update the Recipient’semailby replacing it with the email provided. Unless thatemailis already occupied by another Recipient. If that’s the case, we throw the errorEmail already exists. -
If a Recipient is not found with the
refid, the Widget tries to create a new Recipient with the providedemailand assign therefidto it.
This is the complete rule for what happens when you use the refid and email parameters as
argument to the Widget url.
If we assume that we have a system which already has two registered users:
- samantha@example.com with
refId= 1234 - tom@example.com with
refId= 7777
Calling the Widget with the following parameters will result in the following behaviors:
| samantha@example.com | tom@example.com | bob@example.com (new email) |
(blank) | |
|---|---|---|---|---|
| 1234 | Load widget for Samantha. | Load widget for Samantha. | Load widget for Samantha, update Samantha’s email to bob@example.com. |
Load widget for Samantha. |
| 7777 | Load widget for Tom. | Load widget for Tom. | Load widget for Tom, update Tom’s email to bob@example.com if the email is unique. If not, raise “Error: Email already exists.” |
Load widget for Tom. |
5678 (new refid) |
Error: Email already exists. | Error: Email already exists. | Create a new recipient with email, assign refid to it. |
Error: Must refer to existing recipient. |
| (blank) | Load widget for Samantha. | Load widget for Tom | Create new recipient with email. |
Error: Missing required parameter. |
As a reminder the Trolley treats email address as a unique key across the system.
Optional Configuration
You can provide more configuration options to the Widget to aide the recipient experience. You can pre-fill some of the recipient information, set a locale to render the Widget in more languages, style the Widget, and more.
Here is the information on how to do set these configuration options.
Email Field Options
| Parameter | Example | Description |
|---|---|---|
roEmail |
true or false |
If set to true, the email field is read-only. The default is false. |
hideEmail |
true or false |
If set to true, the email field is not shown. The default is false. |
Account Type Selector Options
| Parameter | Example | Description |
|---|---|---|
hideAccountType |
true or false |
If set to true, the account type selector is not shown. The default is false. |
Setting a Locale
| Parameter | Example | Description |
|---|---|---|
locale |
en, fr etc. |
The widget is rendered in the specified locale. The default is en. Look at the Supported Language Code Reference to learn about other allowed values. |
Showing Modules
You can use the products parameter to specify which modules you want to load in the Widget.
The default is to load all the modules enabled in your merchant account.
For all the modules, the recipient’s profile will be showed first, followed by the module you selected.
| Parameter | Example | Description |
|---|---|---|
products |
pay,trust |
A comma separated String value. Allowed values can be a mix between pay, tax, and trust. |
For more information, refer to the Widget Modules section.
Payout Methods to show
If you’re using the Pay module, you can select which payout methods the recipient can fill in.
A combination of following values, separated by commas (without spaces) can be supplied:
bank-transfermobile-walletdebit-cardcheckpaypal
| Parameter | Example Values | Description |
|---|---|---|
payoutMethods |
bank-transfer , or mobile-wallet,debit-card |
A comma separated String value. |
Recipient Address
A set of optional fields which will be used as default values in the recipient information section of the Widget. You can use these values to pre-fill the User Profile section.
Refer to the sample code to learn how to use this configuration, here’s a description of the address fields:
| Parameter | Example | Description |
|---|---|---|
addr.firstName |
Jane | First name of the recipient. |
addr.lastName |
Doe | Last name of the recipient. |
addr.governmentId |
ABCD1234# | Government ID, if any, of the recipient. |
addr.street1 |
123 Some Street | First line of the street address. |
addr.street2 |
Apt 12 | Second line of the street address. |
addr.city |
Montreal | City of the recipient. |
addr.postalCode |
K1A 0B1 | ZIP/Postal code. |
addr.region |
QC | Region code. |
addr.country |
CA | ISO ALPHA-2 Country Code. |
All values are in String format
Widget Styling
Although you select the Widget’s styling and branding from the Trolley Dashboard, you can override these values by supplying them in the query parameters.
Refer to the sample code to learn how to use this configuration, here’s a description of the fields:
| Parameter | Example |
|---|---|
colors.heading |
"#111111" |
colors.inputText |
"#222222" |
colors.inputBorder |
"#333333" |
colors.text |
"#555555" |
colors.subText |
"#666666" |
colors.background |
"#777777" |
colors.primary |
"red" |
colors.border |
"blue" |
colors.success |
"#AAAAAA" |
colors.error |
"#BBBBBB" |
colors.warning |
"#CCCCCC" |
All values are in String format
Supported Language Codes
The Widget supports the following ISO 639-1 language codes:
| Code | Language |
|---|---|
| bg | Bulgarian |
| bn | Bengali |
| cs | Czech |
| da | Danish |
| de | Deutsch |
| el | Greek |
| en | English |
| es | Spanish |
| fi | Finnish |
| fr | French |
| hr | Croatian |
| hu | Hungarian |
| id | Indonesian |
| it | Italian |
| ja | Japanese |
| ko | Korean |
| lt | Lithuanian |
| lv | Latvian |
| mk | Macedonian |
| ms | Malay |
| nl | Dutch |
| no | Norwegian |
| pl | Polish |
| pt | Portuguese |
| pt-BR | Brazilian Portuguese |
| ro | Romanian |
| ru | Russian |
| sk | Slovakian |
| sl | Slovenian |
| sv | Swedish |
| th | Thai |
| tr | Turkish |
| uk | Ukrainian |
| vi | Vietnamese |
| zh | Chinese (Traditional) |
| zh-CN | Chinese (Simplified) |
Reach out to us at developers@trolley.com for any further questions you may have.